Development
Environment setup
Prerequisites
Before setting up the development environment, you need to install some required libraries and the following tools:
uv - Fast Python package installer and dependency manager
just - Command runner for project automation
Qt 5 libraries and tools
Fedora 42
sudo dnf install qgis qgis-devel python3-devel qt5-designer qt5-linguist
Install uv
# Using curl (recommended)
curl -LsSf https://astral.sh/uv/install.sh | sh

# Or using pip
pip install uv
Install just
# On Ubuntu/Debian
sudo apt install just

# Or using cargo
cargo install just

# Or download from releases
curl --proto '=https' --tlsv1.2 -sSf https://just.systems/install.sh | bash -s -- --to ~/.local/bin
Suggested IDE: Visual Studio Code
This project includes pre-configured settings for VS Code, available in .vscode folder, including linting, formatting and tasks settings.
To get started with VS Code:
# Install VS Code (Ubuntu/Debian)
sudo snap install code --classic

# Or download from https://code.visualstudio.com/

# Open the project in VS Code
code .
VS Code will automatically suggest installing recommended extensions when you open the project.
Quick Setup (Recommended)
Warning
At the moment the quick setup is only supported on Linux. For other OS environments, follow and adapt the manual setup instructions.
The easiest way to set up the development environment is using the automated setup:
# Create virtual environment, install dependencies, and set up development links
just bootstrap-dev
This command will:
Create a Python virtual environment with system-site-packages (for PyQGIS)
Install all development dependencies using uv
Create symbolic links for development
Manual Setup
If you prefer to set up the environment step by step:
1. Create virtual environment
Using uv (recommended):
# Create virtual environment with system-site-packages for PyQGIS
just create-venv

# Manual override of the system python version if needed
just create-venv-manual 3.13
Alternative methods:
Using qgis-venv-creator through pipx:
# Install pipx if not already installed
sudo apt install pipx

# Create QGIS-compatible virtual environment
pipx run qgis-venv-creator --venv-name ".venv"
Traditional method:
# Create virtual environment linking to system packages (for PyQGIS)
python3 -m venv .venv --system-site-packages
source .venv/bin/activate
2. Install development dependencies
With uv (recommended):
# Install all dependency groups (dev, testing, docs, ci)
uv sync --all-groups

# Or install specific groups
uv sync --group dev --group testing
Traditional method:
# Activate virtual environment first
source .venv/bin/activate

# Upgrade pip and install dependencies
python -m pip install -U pip
python -m pip install -U pytest  # install dependencies listed in pyproject.toml

# Install git hooks (pre-commit)
pre-commit install
3. Development Links and QGIS Profile
Create Development Links
To develop the plugin, you need to create symbolic links so QGIS can find your plugin:
# Create symbolic links to your QGIS plugins directory
just dev-link

# Or specify a custom QGIS plugin path
just dev-link /path/to/your/qgis/plugins
Dedicated QGIS Profile
It’s recommended to create a dedicated QGIS profile for the development of the plugin to avoid conflicts with other plugins.
From the command-line (a terminal with qgis executable in
PATHor OSGeo4W Shell):# Linux qgis --profile plg_dip_strike_tools # Windows - OSGeo4W Shell qgis-ltr --profile plg_dip_strike_tools # Windows - PowerShell opened in the QGIS installation directory PS C:\Program Files\QGIS 3.40.4\LTR\bin> .\qgis-ltr-bin.exe --profile plg_dip_strike_tools
Then, set the
QGIS_PLUGINPATHenvironment variable to the path of the plugin in profile preferences: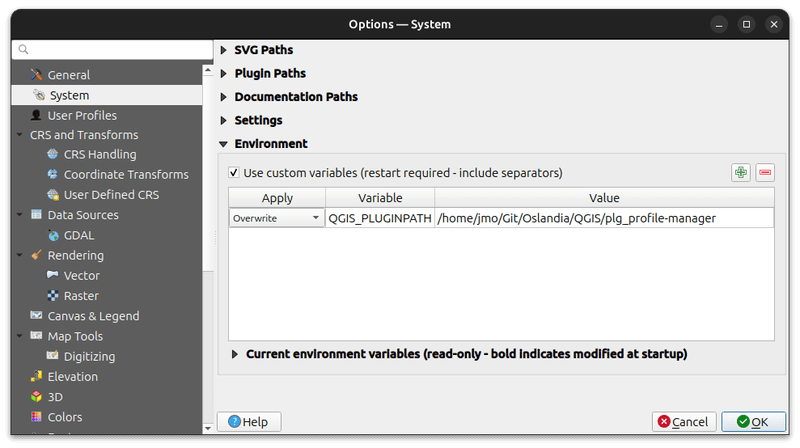
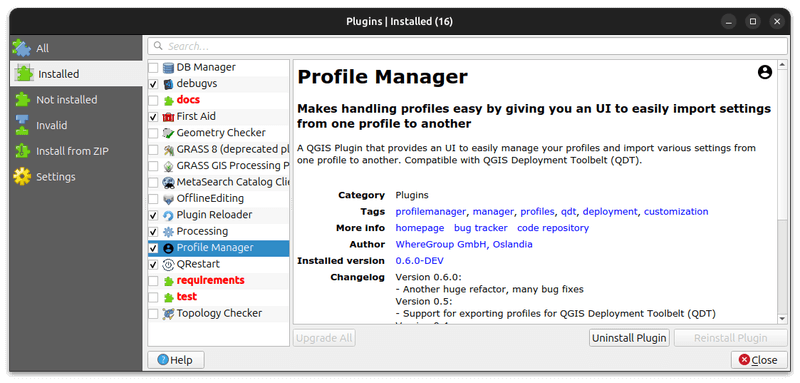
Finally, enable the plugin in the plugin manager (ignore invalid folders like documentation, tests, etc.):
Alternative: Using Docker
For a consistent development environment, you can use Docker to run QGIS:
# Pull the latest QGIS LTR Docker image
just qgis-ltr-pull

# Start QGIS in Docker (Linux only)
just qgis-docker
This automatically mounts your plugin directory and provides a clean QGIS environment.
Common Development Tasks
The project uses just as a command runner to automate common development tasks. Here are the most useful commands:
# Show all available tasks
just

# Create virtual environment and set up development links
just bootstrap-dev

# Update dependencies to latest versions
just update-deps

# Run tests with coverage
just test

# Update translation files
just trans-update

# Compile translation files
just trans-compile

# Build documentation with auto-reload (for development)
just docs-autobuild

# Build HTML documentation
just docs-build-html

# Create development symlinks (if not using bootstrap-dev)
just dev-link

# Start QGIS LTR in Docker (Linux only)
just qgis-docker

# Package the plugin for distribution
just package <version>
Using VS Code Tasks
If you’re using VS Code, the project includes pre-configured tasks that you can run directly from the editor:
Ctrl+Shift+P → “Tasks: Run Task” to see all available tasks
Upgrade Dependencies: Update all development dependencies
Run Tests: Execute the full test suite
Translation Update: Update translation files
Translation Compile: Compile translation files
Create Virtual Environment: Set up the development environment
Sync Dependencies: Install project dependencies
These tasks use the same just and uv commands but provide a convenient GUI interface within VS Code.
Using uv directly
Use uv run <command> to ensure commands run in the correct virtual environment.
# Run commands in the virtual environment
uv run pytest
uv run ruff check
uv run pre-commit run --all-files

# Add new dependencies
uv add requests  # Runtime dependency
uv add --group dev black  # Development dependency
uv add --group testing pytest-mock  # Testing dependency

# Install packages
uv sync  # Install all dependencies
uv sync --group dev  # Install dev dependencies only
uv sync --all-groups  # Install all dependency groups

# Update dependencies
uv lock --upgrade  # Update lock file
uv sync  # Apply updates